


Step-by-Step Guide: How to Install WSL and Ubuntu on Windows for Hassle-Free Linux Integration
In recent years, there has been a significant increase in the number of developers using Windows as their primary operating system. However, many developers still prefer Linux-based systems due to their flexibility and open-source nature. Fortunately, Windows 10 and Windows 11 have a feature called Windows Subsystem for Linux (WSL) that allows you to run a Linux environment, such as Ubuntu, directly on your Windows machine without having to switch to a separate machine or virtual machine.
In this guide, we will walk you through the steps on how to install WSL and Ubuntu on Windows system.
Step 1: Enable WSL
Before installing Ubuntu, you need to enable the Windows Subsystem for Linux feature. To do this, follow these steps:
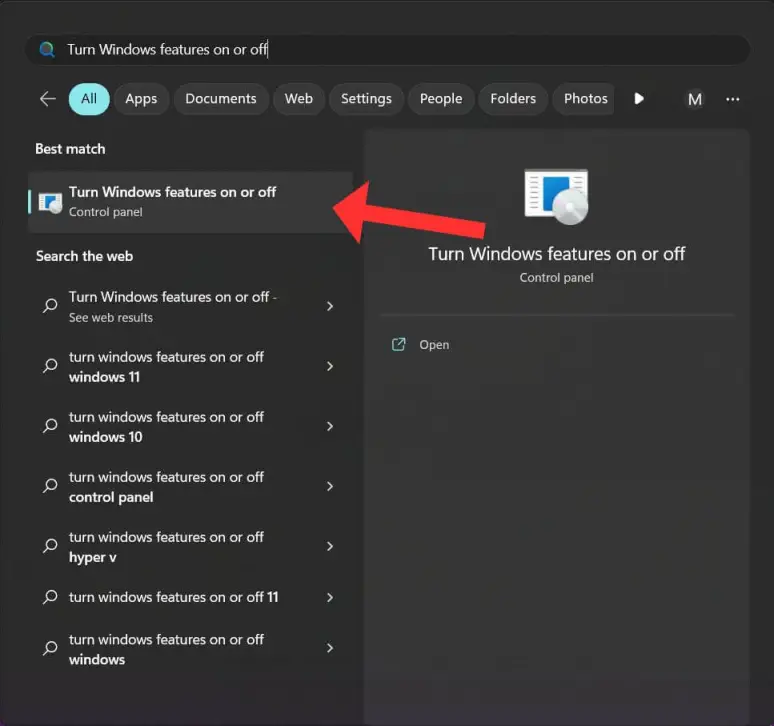
- Open the Start menu and search for “Turn Windows features on or off”
- Scroll down to find “Windows Subsystem for Linux” and check the box next to it
- Also, find “Virtual Machine Platform” and check the box next to it
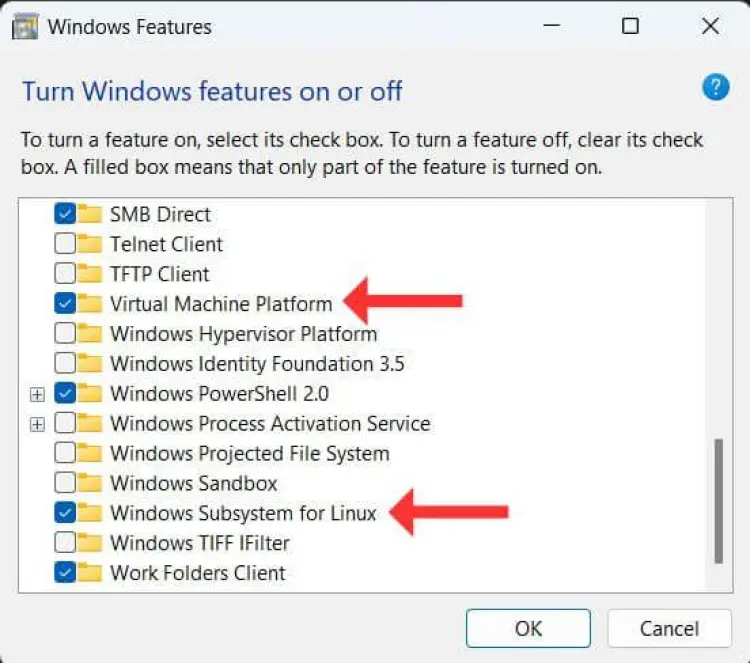
- Click OK and restart your computer when prompted
Step 2: Install Ubuntu
Now that you have enabled the WSL feature, you can install Ubuntu from the Microsoft Store by following these steps:
- Open the Microsoft Store app
- Search for “Ubuntu” in the search bar and select “Ubuntu 20.04 LTS” (or the latest version available)

- Click on the “Get” button and wait for the download and installation to finish
Step 3: Launch Ubuntu
Once Ubuntu is installed, you can launch it by following these steps:
- Open the Start menu and search for “Ubuntu 20.04 LTS” (or the version you installed)
- Click on the Ubuntu app to launch it
- The first time you launch Ubuntu, it will take some time to set up the environment. Follow the on-screen instructions to complete the setup process.
Step 4: Using Ubuntu on Windows
Now that Ubuntu is installed and set up on your Windows computer, you can start using it. Here are a few things you might want to do:
- Install packages: Use the “sudo apt-get install” command to install packages just like you would on a regular Ubuntu machine.
- Run commands: You can run any Ubuntu command from the Ubuntu command line just like you would on a regular Ubuntu machine.
- Access files: You can access your Windows files from within Ubuntu by navigating to the “/mnt/c/” directory.
- Launch GUI apps: You can also launch graphical user interface (GUI) apps from within Ubuntu by installing an X server on Windows and setting the DISPLAY environment variable.
That’s it! You now have Ubuntu running on your Windows 10 machine. You can use the terminal to run Linux commands and install Linux software just like you would on a Linux machine.
Conclusion
Installing WSL and Ubuntu on Windows 10 is a straightforward process that can be completed in a few easy steps. With this setup, you can enjoy the best of both worlds – the flexibility of Linux and the familiarity of Windows. If you’re a developer who needs to work with both Linux and Windows environments, WSL is an excellent solution that can save you time and make your workflow more efficient.
About Author

Liked the post, share with others: