


Creating Your First “Hello World” Module in Magento 2: A Beginner’s Guide
In this blog post we will see how to create simple “HelloWorld” module in magento2.
In magento2 all modules reside in the folder app/code, previously in magento1 there was the concept of local/ community/ core/ folders but that has been removed now.
In this blog post we will see how to create a new module, create a route and display “Hello World”
Step 1: Creating The Directory Structure
Module names in Magento 2 are divided into two part “VendorName_ModuleName” e.g Magento_Contact, Magento_Catalog or ManishJoy_HelloWorld
First part is the vendor name which can be your company name and second part is the actual module name.
Let’s take our module name to be “ManishJoy_HelloWorld”. First we need to make the directory structure for this module:
app/code/ManishJoy/HelloWorld
Step 2: Creating module.xml
Introduce your module by creating a module.xml file within the /etc directory of your component like this:
<?xml version="1.0"?>
<config xmlns:xsi="http://www.w3.org/2001/XMLSchema-instance" xsi:noNamespaceSchemaLocation="urn:magento:framework:Module/etc/module.xsd">
    <module name="ManishJoy_HelloWorld" setup_version="1.0.0"/>
</config>
The “name” attribute specifies your module’s name and is mandatory for all components. If you’re not utilizing the Declarative Schema for managing installation and upgrades, include the “setup_version” attribute in the module tag. Assign the “setup_version” value to match your module’s database schema version. If you’re using Declarative Schema, there’s no need for the “setup_version” attribute.
If you don’t have any idea about “Declarative Schema”, don’t worry. We will discuss in details in some other blog. In this blog, let’s focus on the basics of creating your first Magento 2 extension(module).
Step 3: Creating registration.php
To register your module, you need to create a registration.php file with the following content:
<?php
\Magento\Framework\Component\ComponentRegistrar::register(
    \Magento\Framework\Component\ComponentRegistrar::MODULE,
    'ManishJoy_HelloWorld',
    __DIR__
);
Step 4: Enabling the Module
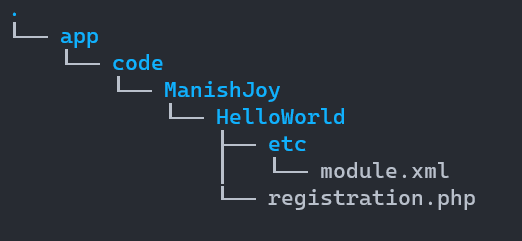
Now an empty module is ready, we now need to enable it. Before that, check and verify your directory structure, it should look like this:
At this stage if you run this command
bin/magento module:statusYou should see
List of disabled modules:
ManishJoy_HelloWorld
This means the module is setup, but it is disabled right now. To enable the module, run this command:
php bin/magento module:enable ManishJoy_HelloWorldThis should enable your module. Another way of doing this is, go to this file:
app/etc/config.php
You will see a long list of modules there, just add your module as well:
...
'ManishJoy_HelloWorld' => 1,
....
This will enable your module as well. After this step, when you open your website in browser you will get an error saying:
Please upgrade your database: Run "bin/magento setup:upgrade" from the Magento root directory.
To fix this, just run the setup:upgrade command:
bin/magento setup:upgradeAt this point you are all set with an empty module.
Step 5: Creating Your first Route and Testing Your Module
As we have created an empty module and have enabled it too. But you cannot see any impact of this module. Let’s create a new URL and display “Hello World”. In order to do it, we need to create a Magento Route and Controller.
Routes/URLs in Magento are divided into 3 parts like this:
http://yourbaseurl.com/route_id/controller/action
To add a route, we need to add routes.xml file in your module like at app/code/ManishJoy/HelloWorld/etc/frontend/routes.xml
Since this is a frontend route, we added it in frontend/ directory else we need to add it to adminhtml/ directory.
This will the content of this file:
<?xml version="1.0"?>
<config xmlns:xsi="http://www.w3.org/2001/XMLSchema-instance" xsi:noNamespaceSchemaLocation="../../../../../../lib/internal/Magento/Framework/App/etc/routes.xsd">
    <router id="standard">
        <route id="manishjoy" frontName="manishjoy">
            <module name="ManishJoy_HelloWorld" />
        </route>
    </router>
</config>
We usually keep id and frontName the same (we will discuss these keywords in detail in some other blog. Let’s just focus on creating your first route and displaying “Hello World”).
Here we defined the first part of our route. So till now our route is
http://yourbaseurl.com/manishjoy/*
Next, we need to define our controller and action. Let’s assume we want our URL to be
http://yourbaseurl.com/manishjoy/hello/world
For this, we need create the controller file at this path: app/code/ManishJoy/HelloWorld/Controller/Hello/World.php
Now let’s add the code to our Controller World.php
<?php
namespace ManishJoy\HelloWorld\Controller\Hello;

use Magento\Framework\App\Action\HttpGetActionInterface;

class World extends \Magento\Framework\App\Action\Action  implements HttpGetActionInterface
{
    public function execute()
    {
        echo 'Hello World';
        exit;
    }
}
Now you are all set, now you can open the URL http://yourbaseurl.com/manishjoy/hello/world to test it. If you have followed all of the above steps properly, you should be able to see the output “Hello World” displayed on the page.
Important
1. There is another important thing to note, if you miss out controller or action name it automatically defaults to Index. Meaning, a url like http://yourbaseurl.com/manishjoy would find path
ManishJoy/HelloWorld/Controller/Index/Index.php
2. Another important thing, magento create auto generated files at var/generation/ManishJoy/HelloWorld/Controller . So if your noticing that, your making changes to controller and the changes are not showing up. Make sure to run setup:di:compile command
Conclusion
Congratulations, you have created your first module in Magento. We will learn more advanced features and customizations in the upcoming blogs of the Module Development Series.
About Author

Liked the post, share with others: